Collage means assembling different colors, textures, shapes, and materials to create a new concept. Our first photoshop project will be a personal photo collage with the theme of "Who am I?" Whenever you're beginning a project like this, it's wise to look at how other artists have dealt with the media. Research the following artists that have worked in a collage medium:
Fill out the brainstorming Collage to Canvas think sheet before you begin gathering photo assets for this project - it will speed up the process. Photoshop Skills List
Document Setup
Competencies this week: 505 - Demonstrate basic use of a vector-based drawing program (e.g. Illustrator). 507 - Demonstrate basic use of image editing software (e.g. Photoshop). 508 - Demonstrate intermediate use of image editing software (e.g. 607 - Demonstrate basic knowledge of printing processes. 801 - Operate digital camera and accessories. 804 - Demonstrate ability to physically stabilize camera Agamograph Project: This project should prove to be a real challenge, but you will love the finished product. I'm guessing that you've never created anything quite like this before. You will be creating a style of visual art that was conceived by the Israeli artist, Yaacov Agam. To learn about his life's work, watch this video below: It's difficult to show Agam's work statically in a still photograph - the work requires movement on the part of the viewer. The term for this is kinetic sculpture. Below are a few past projects that simulates that movement: Some tips for approaching this project:
Below is a sample image that I created in Photoshop several years ago: 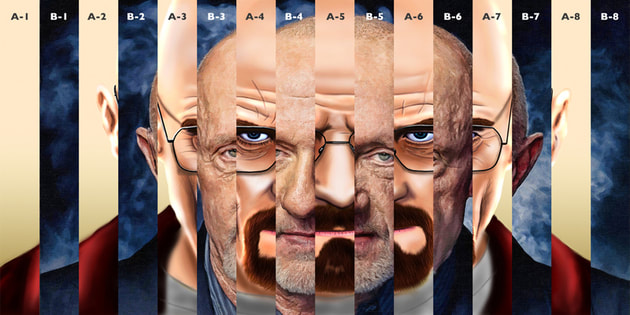 Choices. The first major project we work on this year is going to be about human emotion and the choices that artists get to make. Human emotion drives all art forms - music, dance, film, visual arts, theater, sculpture - whatever the art, human emotion lies at the heart of its creation. Through this project you're going to learn some technical skills - we'll be breaking into small 20 minute boot camps periodically on how to accomplish a number of manipulative skills and some methods for approaching the creative process. Both Mr. Tucker and Mr. Hicks want to see what you already know, and what you can do in the next two to three weeks to create an original product. Teams. Your first choice is how are you going to work - what media are you going to use and how are you going to work? Independently or with a team of creators. Your finished project can be a film, an animation, a slideshow, fine art presentation, or any other kind of multimedia product that you can imagine. That is a wide window of opportunity. We'll be discussing what talents and skills are needed to produce a short film, an animation or a slideshow. When I was a student, I hated group projects because all too often the real work got dumped on a few dedicated individuals. That won't happen here - you will have the ability to fire any non-productive team members and those folks will have to create their project independently. The theme. This project needs to represent any single or combination of human emotions (see list below for ideas or come up with your own.) What you need to keep in mind is the idea of crafting a small finished product really well! This has no time requirement, but should tell a brief story. Competencies this project:
 Project Resources: Yearbook Work: This week is an important week. We need to complete last minute details, package all finished pages, and upload the finished packages to Tuckers Resources>2015 Shield Files>DONE PAGES folder. We will be checking on Thursday and Friday to make sure all files are present. During spring break I will be compiling the finished book and ALL FILES have to be there for that work to proceed so we make deadline. Perspective Cropping: Last week we took a picture for senior standouts that was slightly out of perspective - the image included a frame around a portrait of Matt and Luna. We will be working with this image to understand how later versions of Photoshop allow us to fix the perspective so we get the image that we need. Download this image to complete this lesson. Project Choices for the Coming Weeks: Once your yearbook responsibilities are complete, you have a number of options for project work. We will be working on these three projects over the next three weeks. All students will be required to complete at least two of these projects by April 17th. All three should be really fun to work on and they will be a welcomed break from yearbook pressures and NOCTI testing. Defying Gravity with Photoshop tutorial step-by-step Shape Cluster Photo Display with Photoshop tutorial step-by-step  Agamograph Project: This project should prove to be a real challenge, but you will love the finished product. I'm sure you've never created anything quite like this before. You will be creating a style of visual art that was conceived by the Israeli artist, Yaacov Agam. To learn about his life's work, watch this video below: It's difficult to show Agam's work statically in a still photograph - the work requires movement on the part of the viewer. The term for this is kinetic sculpture. Below is a video that simulates that movement: Below is a how-to video on creating an agamograph like the one show above: Some tips for approaching this project:
Below is a sample image that I created in Photoshop:  Objectives for Week 6
Media Files and Links for this week:
Yearbook Project - Portraits A small number of Commercial Art students have been taking student portraits over the past month and a half. Now it's time to get all of us in the program to finish this part of our yearbook. You will be learning how photographers finish a portrait off by correcting and calibrating the following details:
Go Red for Women T-shirt Design We have been asked to do a community service project for Phoenixville Hospital's celebration of the American Heart Association's Go Red for Women campaign. Kathleen Clarke, a cardiac nurse at the hospital, describes what they are looking for below: We are looking at having a contest to design the American Heart Association Campaign GO RED for Women. We were hoping that the students might help us design the t-shirt that we sell to fundraise for the campaign. My initial thoughts are that you all could do something internally to narrow down to 3-5 designs, and then we could have a vote here, giving a small award to the top 3. We have in the past just used the Go Red portion rather than including the “for women” to make it more inclusive of the entire population. The Phoenixville Hospital logo will appear on the left front in the pocket position. What we will be designing is the back of the shirt. Your designs should fit into a letter size space (either landscape or portrait orientation.) You might want to do a little research before beginning to create your design. The event is taking place in February of 2014 and might include a heart icon as a start.
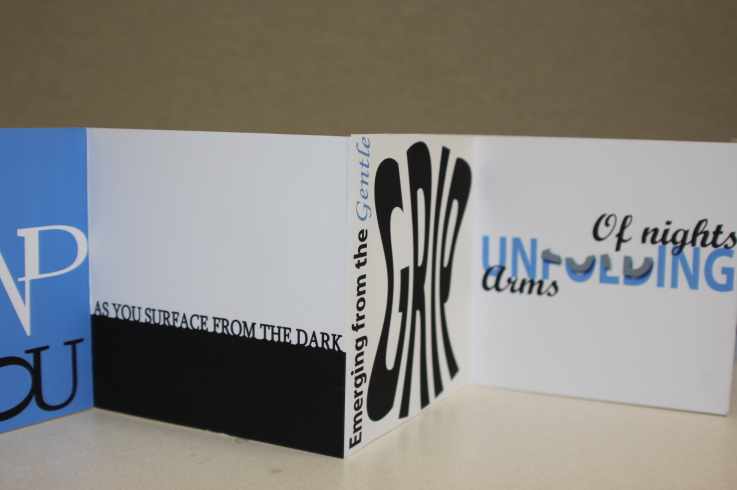
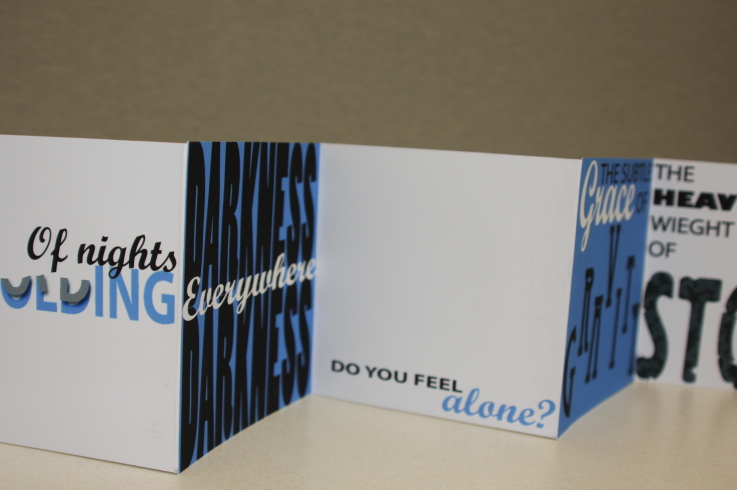
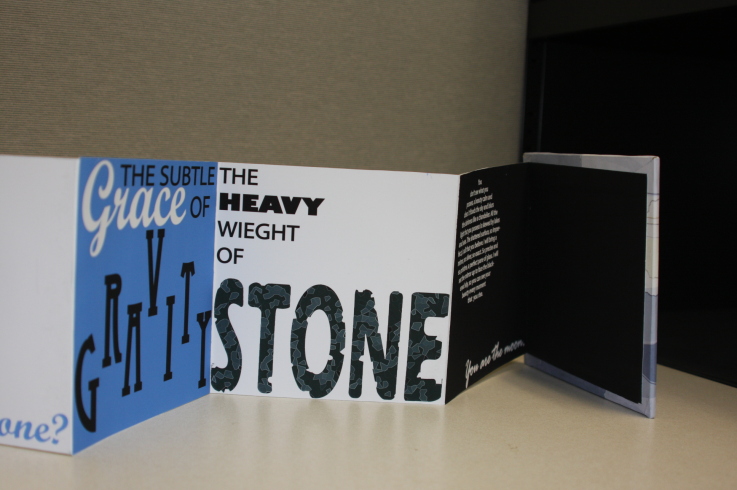
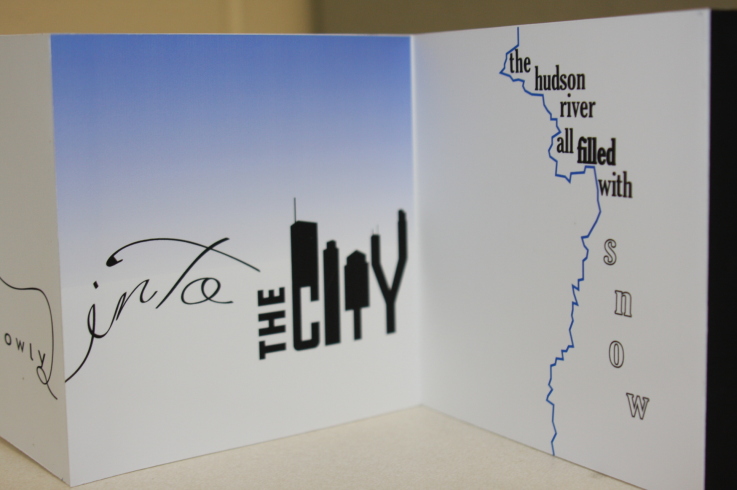
Here is the link to the national organization's event website. I would like to see idea thumbnails in pencil completed by Tuesday afternoon and a finished one-color design by next Friday. All work should be completed in Adobe Illustrator. The winning design will earn an additional t-shirt project in our lab during this school year. I want to see what everyone can do with this as this is great practice for our upcoming SkillsUSA competition in early December. Per the request of several students, we are going to revisit a project we did in the fall of 2012. You are going to be creating an accordian text book. This project could possibly use both Photoshop and Illustrator. Below are the objectives for this project:
This week we will continue to focus on Photoshop basic skills through a major project we'll be using to decorate our room. On Friday, Sean asked me if we could do an Andy Warhol style portrait. Warhol was the father of pop art and he was famous for this style of serigraph (screen printing). Warhol's portraits of Marilyn Monroe, Jacqueline Kennedy and other famous people in the 60s were some of his most popular work. It is important to remember that these portraits were done in an age before Photoshop and Warhol hand cut the color separations for his work.  Photoshop makes creating this style much easier. The Photoshop skills necessary to alter a photograph into this style are as follows:
Below is a video tutorial that we'll be using to learn this technique. We can all create one of Marilyn Monroe. You can download the same image being used in the video by clicking on this link. After you've worked through the technique with Marilyn, I'd like you to create a self-portrait study using either a photo you already have or one taken in our lab. We'll be printing these out for a Welcome to CommArt bulletin board section. One aspect of working in Photoshop that you will learn is that there are multiple ways of solving a problem. Below is another way to create a similar style. Both ways work, if done carefully. This is our first Photoshop project this school year. In this project you will learn to:
Why are we here?Welcome to the 2013-2014 School year at TCHS Pickering! I'm glad to be back working to help you reach your career goals. I'm looking forward to getting to know our new students and growing the potential of all of our students to do great things. I appreciate your feedback - so although this weekly communication will explain what we do every week in our class in my words, this is your forum as well. If you have ideas or suggestions, feel free to comment on these posts every week. You are the reason we're here and you matter the most! What's New?We've added some new technology over the summer:
If you missed our Back to School Night…
|
 Mr. TuckerMr. Tucker is in his 23rd year as the instructor for the Graphic Arts program. Prior to his teaching career he worked in the flexography industry for ten years and in quick printing for ten years. NEED HELP?Weebly Student Log-in Link
PHYS. ED. DAY
AM - Thursdays - 1 PM - Thursdays - 7 HEALTH DAY PM - Mondays - 7 Lake Photo
|
||||||


 RSS Feed